I found out over this past Thanksgiving weekend that I had reached the limit of my picture capacity on this blog. Rather than pay a monthly fee to be able to add more pics, I've opted to start a new blog as a continuation of this one. You can continue to follow the 41 projects here: http://41chevystreetrod.blogspot.com/ My user name is different so don't let that throw you. To all those who have followed along up to this point - Thanks for being here! To any newcomers that happen upon this blog, don't be discouraged by the abrupt end. Just head on over to the new blog and pretend you can hear Paul Harvey saying, "And now for the Rest of the Story!"
See ya there!
Tuesday, November 27, 2012
Sunday, November 18, 2012
Still taking stuff apart!
It's been a couple weeks since I last posted and I've managed to find a few hours during that time to make some progress on the disassembly of the 41. My daughter got engaged a couple weeks ago and her fiance gave me a hand removing the front end sheet metal. I had already removed the transmission, radiator and all necessary items in the engine compartment.


Once the front end was off, the engine was removed and placed in the wooden cradle in order to remove the clutch assembly and bell housing.

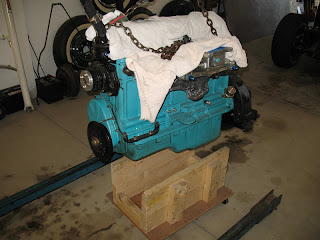
Next, the engine stand head was attached and the stand was slipped in place.

Engine disassembly revealed a few surprises. The valve to piston clearance was much tighter than I had expected. The intake valves have left an impression in the carbon atop the pistons!

There was evidence of some water in the oil when the valve cover was removed but it appears to be merely condensation. The rest of the oil system was clean and clear.


Here's the intake impressions I mentioned.


Unfortunately, the solid lifter retrofit on the hydraulic cam appears to have failed. Several lifter faces show extreme wear as well as a couple cam lobes. Looks like I'll be investing in a new cam and lifters. This time I'll go with a solid lifter design since quality hydraulic lifters are not available for these early six cylinder Chevies. I reread the article on machining the block for the one piece rear main seal and realized More Power can probably do the machining after all. Dick had originally said the 235 block is too long to fit in his mill but the article mentioned doing the machining with a line boring rig. Dick is now confident he can do the machining. I have the one piece seal and Speedi-Sleeve for the crankshaft seal surface repair on order. Those parts should be here before Thanksgiving. I spend a few hours at More Power last Friday sandblasting a stock valve cover and push rod/side cover to remove all the old paint and debris. The stock 57 Chevy axles for the rear end were too long for the sandblaster so I dropped them off to Dennis. He's going to blast the rust and corrosion from the axle flanges for me.
Today was spent washing the engine compartment and front suspension with hot water and soap. I'll have to put the car up on jack stands to finish the cleaning underneath prior to touching up the paint. Cathie helped me remove a bolt holding the dash support to the firewall so I could finish removing the flat panel that fits at the top of the firewall. That piece is going to get a repaint to match the dark green of the body. The stock heater is also out now along with the 2 speed switch by the radio. After studying the instructions for removing the windshield, I decided to give it a try. The rubber frame that the glass fits in was quite hard and had lost most of it's flexibility. I found it to be easier to use a box cutter knife to cut some of the rubber away until I could push the glass panels into the interior of the car and fully remove them. I was surprised that pushing the glass IN was the correct method of removal.
That's about all for now. Hope everyone has a great Thanksgiving!
Subscribe to:
Posts (Atom)