The crankshaft came back at .010" under for both rods and mains. All bearing clearances had to be checked again and the main caps were shimmed to achieve .002" clearance. The new Sealed Power chrome rings were all identical and I checked ring end gap for ALL cylinders this time for both the top and 2nd rings. The short block went back together without incident.
Before we left for Florida, I spotted an ad on Craigslist for old Chevy 216 and 235 parts. I emailed the seller and learned he had a 235 head but didn't know the casting number as it was covered in snow. He thought he already had a buyer for the head and some other parts but promised to stay in touch if that deal fell through. When we got back from Florida, I contacted the seller again and learned that his original buyer had not come through and he would get me the casting number asap. He was located about an hour and a half north of me and his area hadn't received the massive amount of snow we had during the Groundhog Day blizzard (Feb 2). Of all the cylinder head castings used on the 216 - 235 -261 eingines, I kept reading that the most desireable head was the one with a casting number that ended with 848. The 848 head has a smaller combustion chamber which allows a compression ratio of about 8.5:1 instead of the 7:1 with other heads. I figured it was worth searching a bit for an 848 before being forced to run that 53 head again. Luckily, the wait was worth it. Turns out the seller was a 15 year old computer savy kid teaming up with his not-so-computer-savy dad to sell off an accumulation of old parts. Josh (the 15 year old) got back to me around Feb 16th with the casting number off the head. Pay dirt!! Buy a lotto ticket!! It was an 848 head. Seems his dad had rebuilt the 235 engine this head had been on many years ago but used a different head that had been already prepped. This one was off a 1961 Chevy. I drove to Ludington on Sat, Feb 18th and met Josh and his dad in a Meijer gas station. Both were a couple of gearheads. Josh has his own car that he races in demolition events and would rather tinker with that car than play sports. Kind of amazing cuz he's built like a line backer - and only 15! Nice folks.
The 848 head was REALLY grimy and rusty so it was disassembled and sent out for better cleaning than More Power's equipment could do. It came back on Thursday looking much better. The best news was not finding any cracks during magnafluxing! We were heading down the right road this time.
New exhaust seats were installed and #1 cylinder was prepped for a pre-assembly valve to piston clearance check. The .080" clearance on the intake valve was nearly identical to the original 54 head so the 848 would be machined the same way. We had followed the recommedations of Clifford Engineering to prep the 54 head. .100" was removed from the head surface and the intake valves were sunk a compensating .100". The intake stems were cut down .100". That was Clifford's standard method for a 235. However, we had discovered some other things to do to maximize the valve lift and restore proper valve train geometry. We added .100" shims, cut from steel stock, under the rocker arm stands and added .080" lash caps that had been shortened to the exhaust valves. These two items allowed for use of the stock length pushrods and gave us the maximum valve lift. This way we were able to make full use of the Comp Cams camshaft. I'll add pictures of the head once the 848 is ready for installation.
I had originally planned to hold off on any parts removal from the 41 until I was sure the engine project was completed. However, once the engine was originally run on the dyno, I needed to pull some parts so I went ahead with removing the rear end and getting the 57 rear end ready for installation. That's the next chapter that needs updating.
Saturday, February 26, 2011
More Gremlins pay a visit..
Several car friends had been curious regarding the power potential of the little 6 cylinder Chevy and I contacted them after the dyno run to share the hp numbers. 141 seemed acceptable to everyone with one comment being made that Chevy was known to over rate their hp numbers back then so the 115 number was probably high. Nevertheless, something kept knawing at me that 141 was too low. Shoulda been more. I stayed real busy with computer repairs for a couple of weeks and couldn't make it back to More Power right away. I talked to Dick on the phone and told him I wanted to run a leak down test on the motor just to be sure some other issues didn't exist. I finally got a break from the computer biz and made it back to More Power.
The leak down test started off just fine. The first 2 cylinders checked at about 12% leakage which I felt was acceptable. My drag racing engines had checked at 4 - 8% leakage back in the 70's so 12% didn't seem too bad. Then I checked the 3rd cylinder - 65% leakage! I couldn't believe what I was seeing on the pressure guage. Duane came over and double checked my work. He even gave the valve springs a tap to make sure the valves were seated. The valves were sealed up rock solid. The entire pressure loss was blowing straight in the oil pan!! The final 3 cylinders had one at 12% and the other 2 in the 65-68% range. My heart sank. This meant the entire engine had to come apart again to find and fix the problem. The rings were obviously not sealing but why? We had chosen Hastings cast, stock replacement rings for this build. I had checked the ring end gap on #1 cylinder for the top and 2nd ring prior to assembly and found the gap to be about .020" so I hadn't bothered to check the other 5 cylinders. In my old drag racing days, I would buy rings that were .005" oversized and cut the end gap to my desired dimension. The Hastings rings were loose enough that no cutting was necessary. As I was removing the rings from the pistons, I noticed that some were easier to expand with the ring expander than others. When I lay the rings side by side, I was shocked at the what I saw.


Not only were the rings varied in diameter, you could see where only part of the ring surface was contacting the cylinder wall. Further inspection of the bearings showed contaminants in the bearing surface, either from the ring wear or the water contamination - or both. The main and rod bearing journals were scratched on the crankshaft too. Now, we REALLY were back to square one. I cleaned up the parts; the crank went out for grinding; Dick ordered all new parts (bearings, gaskets and Sealed Power chrome rings); Duane rechecked the bores on the block and did a touch up with the hone; and I took a 6 day vacation in Florida with my wife. Hopefully, we had identified and eliminated all the gremlins.
Gremlins in the works!
It's now late Feb and I've been a bit delinquent staying up to date on blog entries. The first run up of the engine occurred in mid-January and I haven't posted since then. I'll try to bring things up to date.
We ran the engine on the dyno just long enough to break in the cam and check that all the sensors were working. We were double checking the timing when the radiator reducer hose let go giving Duane and I a bath with hot water! It was late in the afternoon so we decided to just end the project for the day. Dick repaired the hose connection before we locked up.
The next morning, Dick and I went back to the dyno room to prepare for another warm up and full load testing. For some unknown reason, I decided to check a couple items. I pulled the spark plugs and they all looked good. Then I checked the oil on the dip stick and found an appearance of foaming. That's typically a sign of water in the oil. Just to be sure we didn't have any problems, I pulled the valve cover while Dick connected the water system and opened the valves on the tank. The top of the cylinder head and inside of the valve cover were not a pleasant site. Foam was everywhere! Had to be a water leak somewhere. As we stood there talking and looking we began to see water bubbling through a crack right near one of the intake valve springs. The crack was about 2" long. Considering the small crack Dick had repaired on the deck surface of the head, I suspect this head (off the '54 engine) had been subjected to freezing temps without draining the coolant at one time. We began back tracking our work to determine how we could have missed this during the head machining and realized we forgot to have Duane finish checking for cracks after the first crack had been repaired. Guess we should have thoroughly checked the head before choosing to use it. Oh well, live and learn. Despite my preference for the 54 head's valve cover retaining bolts, we were left with no choice but to use the 53 head. We left the engine on the dyno and pulled the intake, exhaust and head. Dick and Duane did a crash recondition of the 53 head including the mild port grinding I had done on the 54. Three days later, the engine was back together and ready for another dyno test. I had chrome valve and side covers for both engines. They came with the package when I bought the engines. However, the stud type valve cover for the 53 head seemed to be a poor stamping around the corners. No sooner had we started the engine than oil began leaking around the valve cover! Bah! We finally ended up the orignal 53 painted valve cover installed to stop the leaking.
The 53 235 cu in engine is rated at 115hp from Chevrolet in stock form. I was hoping for somewhere around 175 -180 hp on the dyno with the outside chance of hitting 200hp. Dick made 4 or 5 dyno runs that day with timing checks and spark plug replacements as the only changes. The max hp we were able to achieve was 141. I felt a bit disappointed but just accepted that number as "it is what it is". I was more concerned with reliability and durabiltiy that max performance. We pulled the 235 off the dyno and put it back on the engine stand to await transport to my garage once I was ready to install it in the 41.
We had overcome the Cylinder Head Gemlins but, little did we know, other gremlins were still waiting in the engine!
Tuesday, February 1, 2011
Engine assembly
The actual assembly took several weeks as I had never seen the inside of a Chevy inline 6 cylinder before. As I mentioned earlier, I bought 2 engines in the engine parts deal. One was a 1954 and the other was a 1953. The 54 had been running in the guy's car while the 53' had been sitting for quite some time. I wanted to use the '54 because the valve cover was held on with 4 retaining bolts around the rim rather than the 53 and earlier style which was retained with 2 studs that came up thru the center of the valve cover. Turns out the 54 wasn't the better of the two. It had been bored .020 over previously and the crank had been turned .020" on the rods and mains. Plus a couple of rod bearings were scored and failing and the crank would need another grinding. The '53 engine turned out to be very clean inside and show very little wear. I decided to use the 54 head on the 53 block. The block was line bored, bored .030" over for new pistons, and the deck was cut to maximize compression. New .030 over pistons, Comp Cams hydraulic camshaft, new timing gears, Hastings cast rings and Clevite bearings were added to the shopping list. The crank was polished and the rods were reconditioned. The entire rotating assembly was balanced and I carefully cleaned and checked the 53 oil pump for reuse.

Checking the main bearing clearances is a little tricky on these old 6's. Shims are used under the main caps to achieve the desired clearance. I had been warned to keep the main bearing clearances tight to promote proper oil pressure to the lifters. The main clearances came in at .0018 -.0020 with the shims. Look closely on the edge of the center main caps and you can see the copper colored shims.

The crank nose was drilled and tapped for a small block Chevy balancer retaining bolt and the camshaft was degreed to 3 degrees advanced using an offset key. The Felpro gasket set also included a neoprene rear main seal to replace the old rope seal. Much better leakage prevention with the neoprene unit and much less drag on the crank. Here's the block with crank, cam, rods & pistons and oil pump installed.

These old 6's used an external oil filter system that didn't filter all the oil. A little research on the internet produced an article on how to modify the block for full flow filtering. I was a little apprehensive about drilling holes in the side of the block but I did it and it worked! http://www.stovebolt.com/techtips/full_pressure.htm
The cylinder head prep was a lengthy process. The exhaust valves were replaced with stainless ones and new seats were installed to allow running unleaded fuel. (this modification had previously been done on the 216 already in the car). In order to boost compression, Clifford Performance recommends cutting .100" off the head surface and sinking the intake valve that same .100". They also suggest cutting .100" off the valve stem. Take a look at the combustion chamber for this head and you can see why.
If you look closely just to the right of the intake pocket, you'll notice a small circular area. That is one of 3 plugs that were used to repair a crack we found. The process is called "stitching" and has proven to be very effective to repair small cracks. Unfortunately, finding this crack and fixing it caused us to forget to check the rest of the head for any issues. That came back to bite us in the butt later.
The 54 head had a some light porting done in the intake area to round the area below the valve a bit. New valve seals were installed and the Comp Cams springs were installed at the specified 1.700" height. The head was then set on the block and the rocker shafts were installed to check for valve to piston clearance. In order to achieve proper cam lift and valve to piston clearance, .100" shims were added under the rocker stands and .080" lash caps were added on top of the exhaust valves. Here's the head installed and the rocker shafts just sitting in place. You can also see the new holes for the oiling system on the lower side of the block along the oil galley ridges. These will be clearer in a later picture.

Once the valve train was finalized and the block was masked it was off to the paint booth to add some color. Here's the before and after pics.

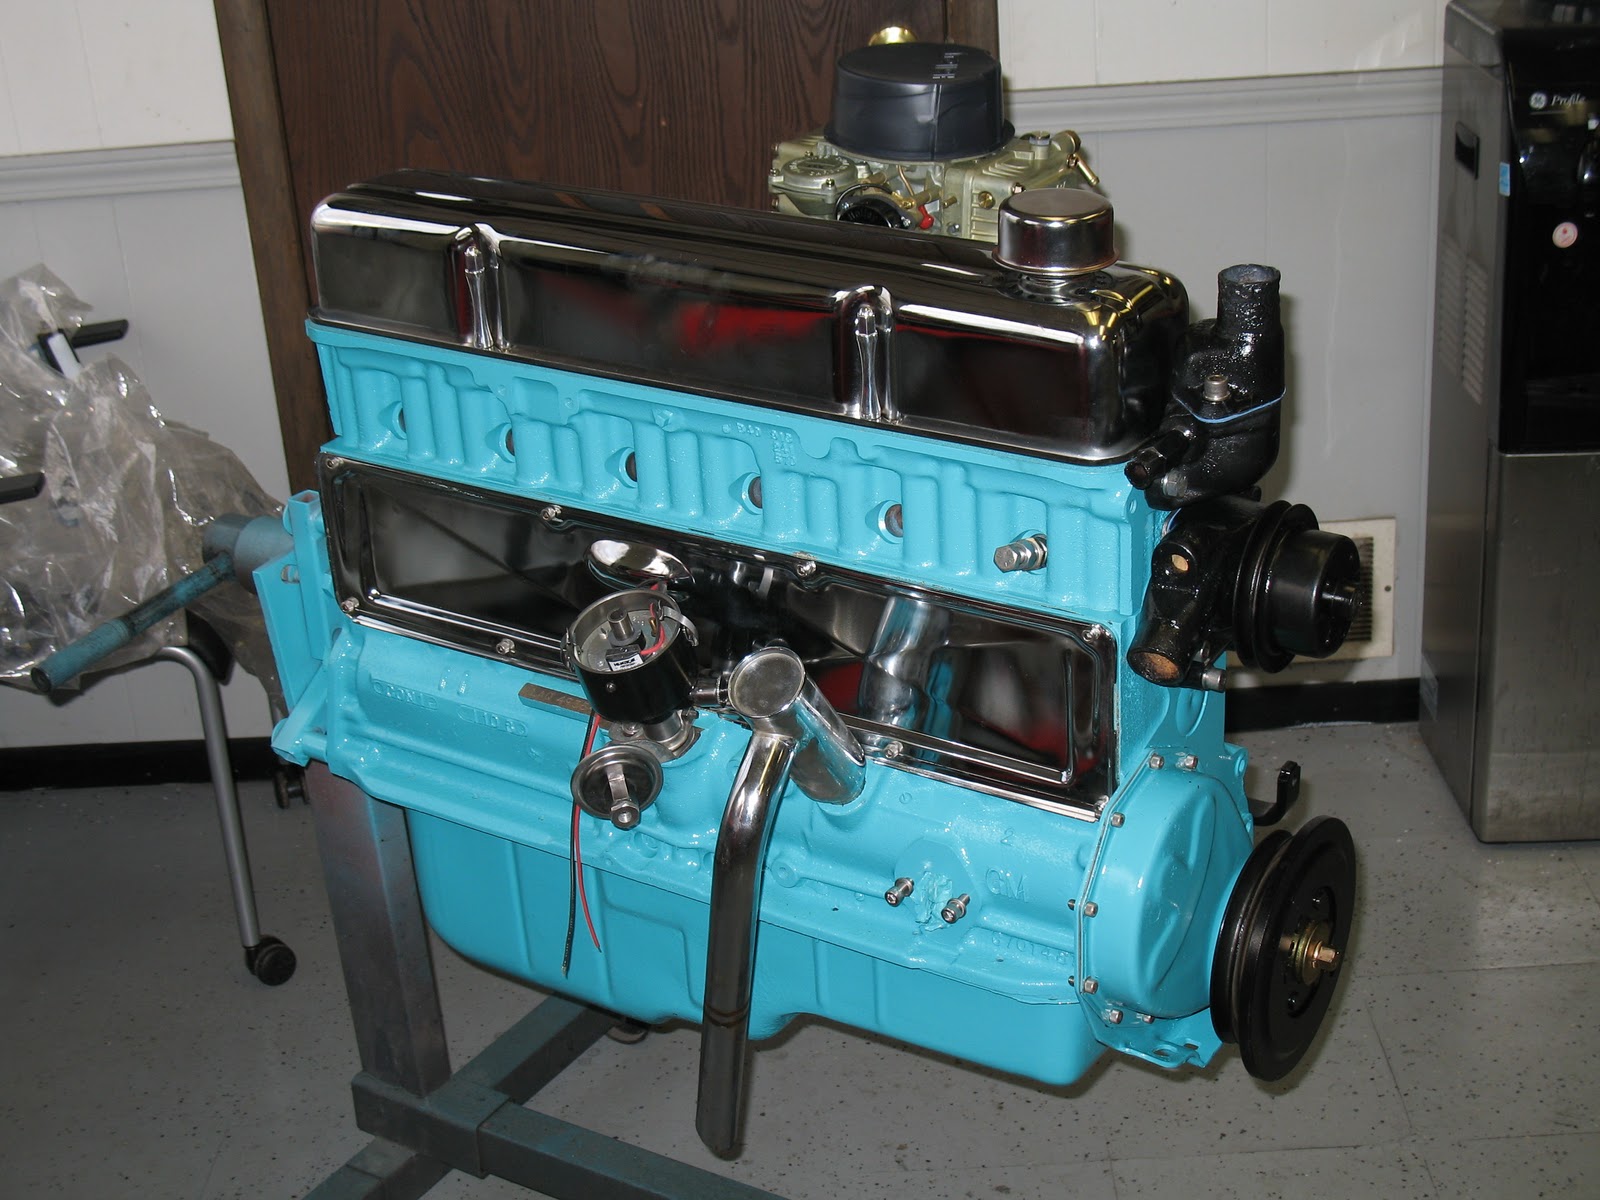
 That color was supposed to match the roof of the car but the NAPA paint store didn't have a color chart for the '41 and I guessed wrong. A second coat of something a bit darker looked better. Then someone suggested using all stainless steel fasteners to spice things up a bit. So, it was off to the hardware store and to Duane's private stock for some nice SS bolts. Add a couple of chrome covers that came with the motor deal, paint the Fenton headers black and bolt on the Clifford polished aluminum 4bbl intake and the little 6 started looking kinda sharp!
 Note the 2 blue fittings in the side of the block. Those are the new holes added for the oiling system filtering. That little Holley carb sitting on top is a new 390 cfm unit with vacuum secondaries and electric choke. In order to test run the 235 on the dyno, I had to add a water pump, balancer and thermostat housing. The ones we used aren't going to be the final units as my generator uses the wide belt (5/8) pulley. I plan to remove the new water pump from the 216 and I have another balancer from the 53 engine.

 The distributor was completely disassembled and cleaned before going back together with a Pertronix electronic kit and a new matching coil. The "plug" in the #1 cylinder above is a piston stop. Setting the timing on these old 6's is done thru a hole in the bell housing and, to me, that is most inconvenient. So, we made a pointer for the front of the engine out of a ss bolt that doubles as a timing cover hold down, found top dead center of number 1 cylinder and marked the balancer accordingly. I also marked a 36 degrees before TDC mark on the balancer. The chrome road tube in the picture above (right in front of the distributor) was later removed and replaced with a black one that had a better shape.
Next it was off to the dyno room to break in the camshaft and see how much HP the little 6 could produce. In stock form, the '53 was rated at 115hp with a single barrel carb. I was expecting somewhere in the range of 175 - 180 hp on the new motor.


Note the timing pointer and oil filter system in the top pic. One of the things stressed by all the old timers is heating the bottom of the intake under the carb to prevent stumbling and poor gasoline atomization. We ran a temp probe right under the carb during the dyno time and the old timers are right! The temp drops a lot when the throttle is opened. Note the water hoses running from the block to the intake and from the thermostat housing to the intake. Dick added a fitting in the thermostat housing for the hose connection. These pics were made prior to running during the initial setup. It was late in the afternoon before we finished the setup and got it running. When the lower water hose blew off the water pump giving Duane and I a warm bath, we figured that was enough for the first day. Little did we know, that was just the beginning of several more issues to follow.

Checking the main bearing clearances is a little tricky on these old 6's. Shims are used under the main caps to achieve the desired clearance. I had been warned to keep the main bearing clearances tight to promote proper oil pressure to the lifters. The main clearances came in at .0018 -.0020 with the shims. Look closely on the edge of the center main caps and you can see the copper colored shims.

The crank nose was drilled and tapped for a small block Chevy balancer retaining bolt and the camshaft was degreed to 3 degrees advanced using an offset key. The Felpro gasket set also included a neoprene rear main seal to replace the old rope seal. Much better leakage prevention with the neoprene unit and much less drag on the crank. Here's the block with crank, cam, rods & pistons and oil pump installed.

These old 6's used an external oil filter system that didn't filter all the oil. A little research on the internet produced an article on how to modify the block for full flow filtering. I was a little apprehensive about drilling holes in the side of the block but I did it and it worked! http://www.stovebolt.com/techtips/full_pressure.htm
The cylinder head prep was a lengthy process. The exhaust valves were replaced with stainless ones and new seats were installed to allow running unleaded fuel. (this modification had previously been done on the 216 already in the car). In order to boost compression, Clifford Performance recommends cutting .100" off the head surface and sinking the intake valve that same .100". They also suggest cutting .100" off the valve stem. Take a look at the combustion chamber for this head and you can see why.
 |
The 54 head had a some light porting done in the intake area to round the area below the valve a bit. New valve seals were installed and the Comp Cams springs were installed at the specified 1.700" height. The head was then set on the block and the rocker shafts were installed to check for valve to piston clearance. In order to achieve proper cam lift and valve to piston clearance, .100" shims were added under the rocker stands and .080" lash caps were added on top of the exhaust valves. Here's the head installed and the rocker shafts just sitting in place. You can also see the new holes for the oiling system on the lower side of the block along the oil galley ridges. These will be clearer in a later picture.

Once the valve train was finalized and the block was masked it was off to the paint booth to add some color. Here's the before and after pics.


Next it was off to the dyno room to break in the camshaft and see how much HP the little 6 could produce. In stock form, the '53 was rated at 115hp with a single barrel carb. I was expecting somewhere in the range of 175 - 180 hp on the new motor.


Note the timing pointer and oil filter system in the top pic. One of the things stressed by all the old timers is heating the bottom of the intake under the carb to prevent stumbling and poor gasoline atomization. We ran a temp probe right under the carb during the dyno time and the old timers are right! The temp drops a lot when the throttle is opened. Note the water hoses running from the block to the intake and from the thermostat housing to the intake. Dick added a fitting in the thermostat housing for the hose connection. These pics were made prior to running during the initial setup. It was late in the afternoon before we finished the setup and got it running. When the lower water hose blew off the water pump giving Duane and I a warm bath, we figured that was enough for the first day. Little did we know, that was just the beginning of several more issues to follow.
Subscribe to:
Posts (Atom)